Как поставить иконку гильдии Роял Квест – Complete Guide to Creating and Setting a Guild Icon in Royal Quest
Creating your own identity in an MMORPG is something every player dreams of. Whether it’s through your gear, your mount, or your guild, standing out in a crowd of adventurers adds a layer of pride to your gaming experience. In Royal Quest, one of the best ways to show your guild’s unity and strength is by adding a custom guild icon, known in Russian as “иконка гильдии”. Many players wonder, Как поставить иконку гильдии Роял Квест? — meaning, How do you set a guild icon in Royal Quest?
This guide covers everything you need to know: from preparing the image to uploading it correctly in the game. Let’s dive into every detail step-by-step to make sure your guild stands out with style.
What Is a Guild Icon in Royal Quest
A guild icon is a small graphic that represents your guild visually. You can see it next to your guild’s name, above characters’ names, and sometimes on guild-related menus. It serves as your signature symbol — much like a flag for your guild.
This icon isn’t just decoration. It’s a badge of honor. It shows other players who you are allied with, what your group stands for, and how organized or active your team might be. Top-tier guilds often have instantly recognizable icons that make them legendary across servers.
If you’re a guild leader, it’s your responsibility to give your guild a symbol worth remembering.
Requirements Before Setting a Guild Icon
Before jumping straight into uploading your emblem, you need to make sure you meet some requirements that the game enforces.
- Guild Ownership – Only the guild master (leader) has permission to upload or change the icon. Regular members cannot do it.
- Guild Level – Your guild might need to reach a minimum level, such as Level 3 or 5, depending on the game update or server rules.
- File Format – The icon must be saved in .bmp (bitmap) format. No PNG or JPG files will work.
- Image Size – The required dimensions are usually 32×32 pixels, though you should check the current version of Royal Quest to confirm.
- File Size – Keep the file small, preferably under 16 KB.
- Transparency – If possible, design your icon with a transparent or solid background that looks clean in-game.
Step-by-Step: Как поставить иконку гильдии Роял Квест
Here’s the complete step-by-step process to successfully create and upload your guild icon in Royal Quest.
Step 1: Design Your Icon
Start by designing your guild’s emblem. You don’t need to be a professional artist — even simple designs can look striking when done right.
- Open a design tool like Paint, GIMP, or Photoshop.
- Create a new image with the size 32×32 pixels.
- Use bold shapes and high-contrast colors. Tiny details will not be visible at such a small size.
- Save your final design as icon.bmp (Bitmap format).
Make sure you save the file in the correct format. Simply renaming a .png to .bmp won’t work — it must be exported properly in BMP format.
Step 2: Locate the Royal Quest Folder
Next, you need to place your file in the right folder within the Royal Quest installation directory.
- Open File Explorer and navigate to your Royal Quest folder.
- The default path is often:
C:\Program Files (x86)\Royal Quest - Inside, you should find a folder named “Emblems” or “Icons.” If it doesn’t exist, create a new folder named Emblems.
Step 3: Move the Icon File
Copy your icon.bmp file into that Emblems folder. The game will look for it there when you upload your guild emblem.
To keep things organized, you can name the file after your guild — for example, knightsofvalor.bmp — but avoid using spaces or special symbols in the file name.
Step 4: Open Royal Quest and Access Guild Menu
Now it’s time to log into your Royal Quest account and upload the emblem.
- Start the game and log in with the guild master’s character.
- Once inside, open the Guild Menu by pressing G (or the button assigned to it).
- In the Guild window, find the Emblem or Icon tab.
This section allows you to manage guild visuals.
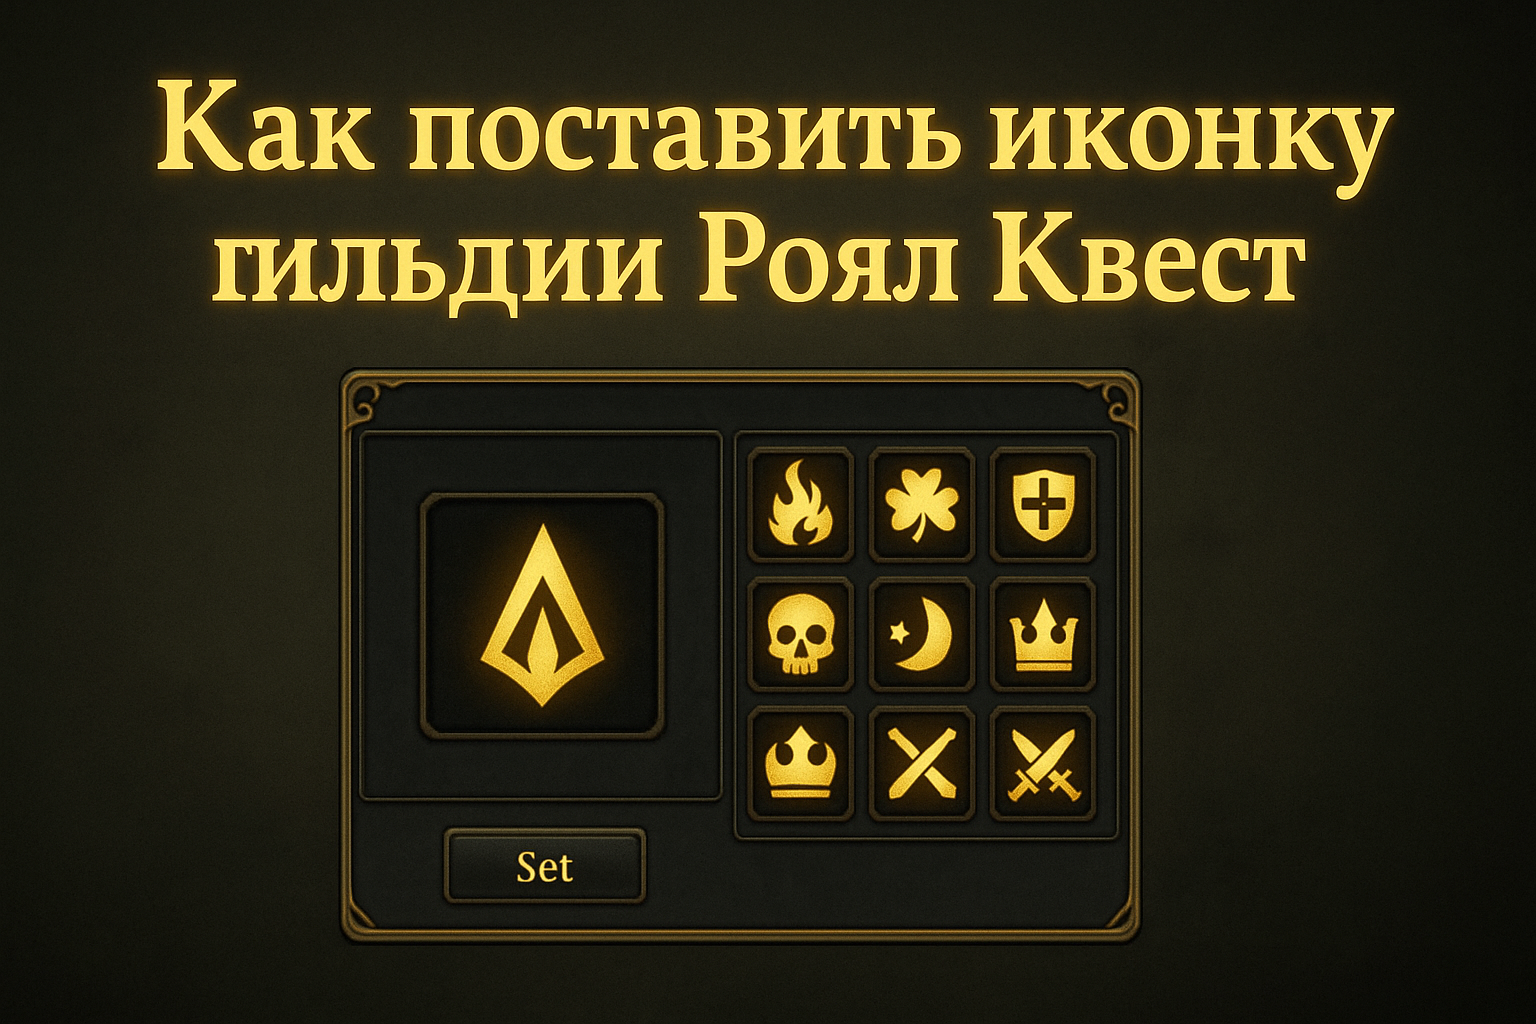
Step 5: Upload the Icon
When the guild menu is open:
- Click the button that says “Set Guild Icon” or similar.
- A file selection window will appear.
- Browse to the folder where your icon.bmp file is saved.
- Select the icon and confirm.
Once you click confirm, your guild’s new emblem will be uploaded and displayed for all members to see.
Step 6: Verify and Apply
After saving, check your guild information tab or your character’s nameplate. The icon should now appear next to the guild name.
If it doesn’t appear immediately, restart your game client. Sometimes, the change only takes effect after relogging.
Designing the Perfect Guild Icon
A well-made guild icon can make your team stand out in the crowd. Here are some creative design tips that will help you craft a memorable emblem.
- Keep it Simple – Since it’s only 32×32 pixels, avoid too much detail. Use simple geometric shapes or symbols.
- Contrast Matters – Choose colors that stand out from the in-game background. For example, bright yellow or silver on dark blue.
- Avoid Text – Small text becomes unreadable. Use imagery instead.
- Think About Your Guild’s Theme – A warrior guild might use swords or shields, while a mage guild could use stars or runes.
- Test in Game – Upload a few designs temporarily to see how they look in actual gameplay before finalizing.
Common Problems and How to Fix Them
Even with careful preparation, players sometimes face issues when trying to set their guild icons. Here are common problems and solutions:
- The Icon Doesn’t Show Up
- Restart the game. Sometimes, it takes a relog for changes to apply.
- Double-check that the file is in
.bmpformat and located in the correct folder.
- File Not Accepted or Error Message Appears
- Make sure your icon is 32×32 pixels exactly.
- Do not rename other image formats to .bmp — convert them properly using an image editor.
- Only the Guild Master Can Upload
- If you are not the leader, you will not see the upload option. Ask your guild master to handle it.
- Icon Looks Blurry or Pixelated
- Ensure your design is optimized for small size. Avoid fine details that don’t scale well.
Why Guild Icons Are Important
In the world of Royal Quest, guilds are more than just player groups. They represent communities, teams, and families that grow together. A guild icon serves as your identity marker, showing who you are and what your guild stands for.
When you participate in PvP battles, castle sieges, or dungeons, your guild’s emblem becomes a visual banner. Other players recognize you instantly, which can help in alliances, rivalries, or recruitment.
A distinctive and memorable icon can also motivate members, giving them pride and belonging within your group. It’s the small detail that can make a big difference in how your guild is perceived.
Additional Tips for Guild Masters
If you’re the guild master managing visuals and structure, here are a few more tips to keep your guild presentation strong:
- Hold an Icon Contest – Let your members design potential emblems and vote on the best one. This increases participation and creativity.
- Update Periodically – Refresh your guild’s look every season or major patch to stay modern.
- Keep a Backup – Always keep a backup of your icon file in case the game updates or files get lost.
- Use Symbolism – Colors and shapes can have meaning. For instance, red may represent strength, blue loyalty, and gold victory.
Read also: HeilxStudio: Redefining the Future of Digital Creativity and Innovation
Conclusion
Setting a guild icon in Royal Quest (Как поставить иконку гильдии Роял Квест) is a straightforward yet meaningful process that adds identity and unity to your team. With a few steps — designing your image, saving it properly, and uploading it through the guild interface — you can make your group stand out in the vast world of Aura.
Whether your guild is a new community of adventurers or an elite team of warriors, your emblem becomes the symbol of your legacy. It represents your victories, your spirit, and your teamwork. Take your time to design something special, because once that icon is visible to others, it becomes part of your guild’s story forever.
A good guild isn’t remembered just by its battles — it’s remembered by its symbol. And now, with this complete guide, you can proudly set yours in Royal Quest.


Post Comment